![](https://yumanoblog.com/wp-content/uploads/pochi01-150x150.png)
イラレ(Illustrator)使いたいけど、最低でも月に2,480円かかるのかぁ。
![](https://yumanoblog.com/wp-content/uploads/pochi01-150x150.png)
がっつり使う予定はないから気軽に手は出せないな。
![](https://yumanoblog.com/wp-content/uploads/yuma_default-150x150.png)
Gravit Designerを使えば、その悩み解決できるよ。
![](https://yumanoblog.com/wp-content/uploads/pochi021-150x150.png)
そうなの?詳しく知りたい!
先日こんなツイートをしました。
ベクター画像作成作成ソフトといえば、アドビシステムズが提供している「Illustrator」通称イラレがありますが、月額の費用が掛かるので1ヶ月のうちにそこまで使う予定のない人にとっては、手を出しにくいですよね。
そんな悩みを抱える人にオススメなのが、イラレと同等の機能を兼ね備えているのに無料で使えるツール「Gravit Designer」なんです。
この記事ではGravit Designerの始め方と、基本的な使い方について解説していきます。
Gravit Designerとは?
Gravit Designerは、Gravit社が提供しているベクター画像の編集・作成ソフトです。
冒頭でお話した通り、無料で使えるのにもかかわらずイラレにも負けない機能を兼ね備えています。
ちなみに有料版も用意されていて、無料版からアップグレードすることで以下の機能が解放されます。
- Cloudのストレージ容量が無制限になる
- EPS、Sketch、Illustratorのファイルをインポートして編集できる
- 300dpiで高品質なPDF をエクスポートできる
![](https://yumanoblog.com/wp-content/uploads/pochi01-150x150.png)
無料版だと基本的な機能も制限されるんじゃないの?
![](https://yumanoblog.com/wp-content/uploads/yuma_default-150x150.png)
編集にかかわる機能は特に制限されていないから安心して大丈夫だよ。
基本的な機能面に関しては無料・有料版で違いはありません。
Gravit Designerの始め方
Gravit Designerはブラウザ上で使うことも、ダウンロードして使うこともできるので、それぞれ解説します。
ブラウザ上で始める場合
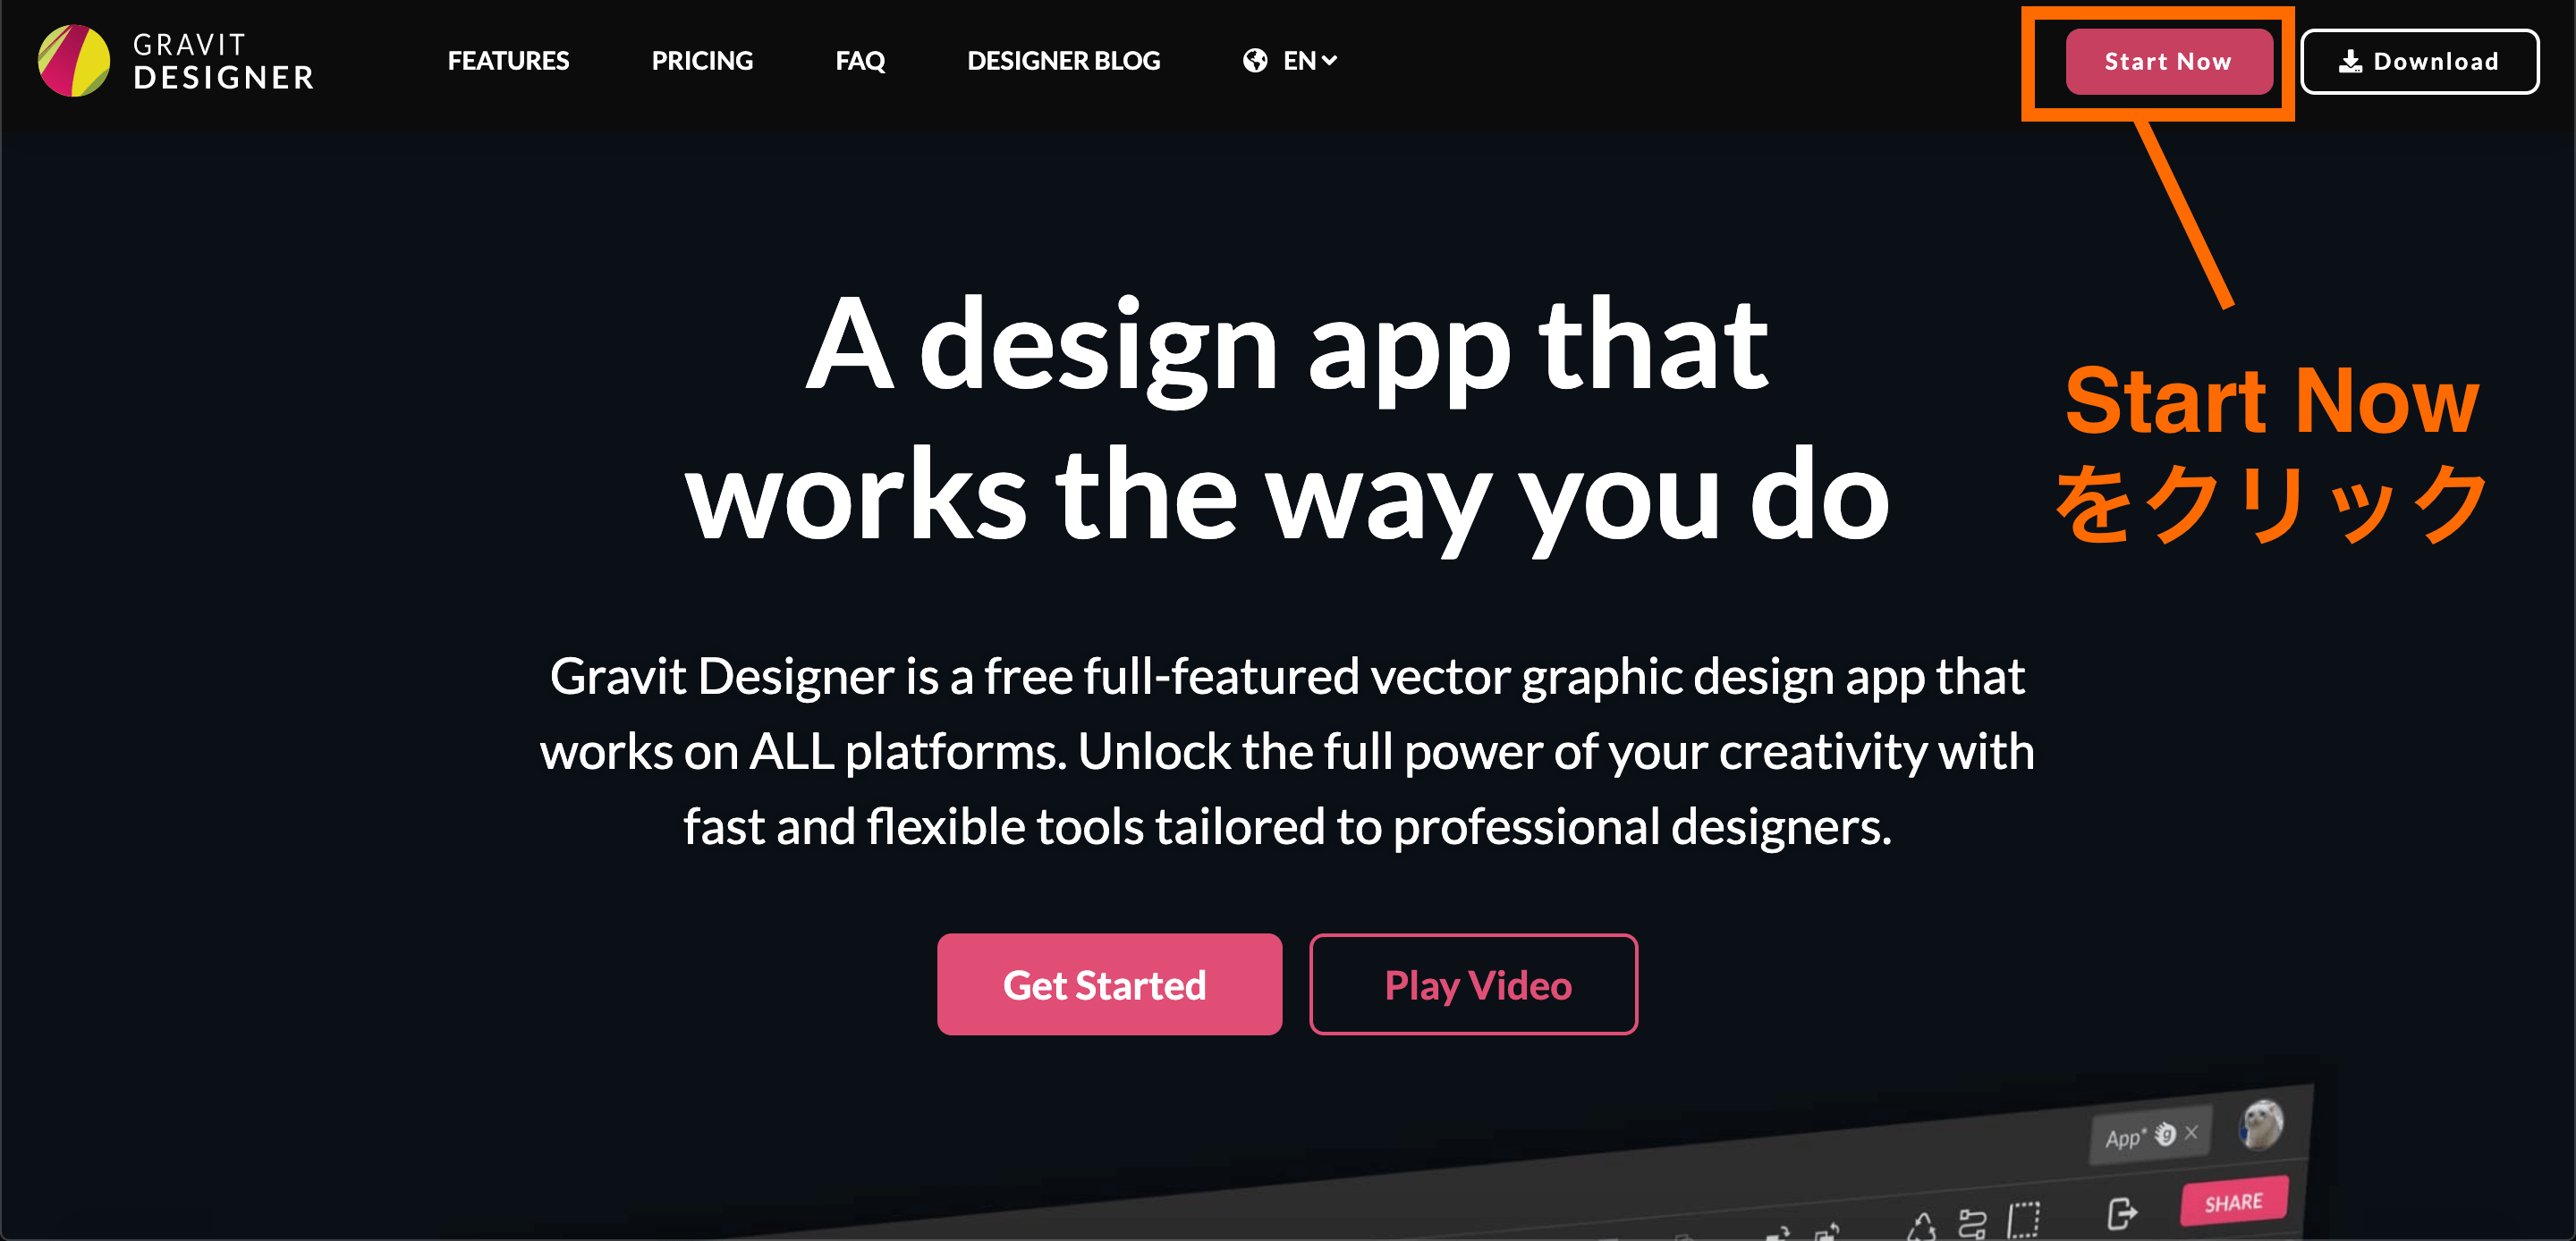
まずはGravit Designerのサイトにアクセスします。
その後、右上の「Start Now」をクリックすると作業画面に飛ぶことができるので、アカウント登録をし始めることが出来ます。
![StartNowをクリック](https://yumanoblog.com/wp-content/uploads/2020/02/StartNowをクリック.png)
ダウンロードして始める場合
まずはGravit Designerのサイトにアクセス。
その後、右上の「Download」をクリックしOSの選択画面へ飛びます。
![Downloadをクリック](https://yumanoblog.com/wp-content/uploads/2020/02/Downloadをクリック.png)
OSの選択画面へ移ったら、使用しているOS用のソフトをダウンロードして下さい。
![使っているOSを選択](https://yumanoblog.com/wp-content/uploads/2020/02/使っているOSを選択.png)
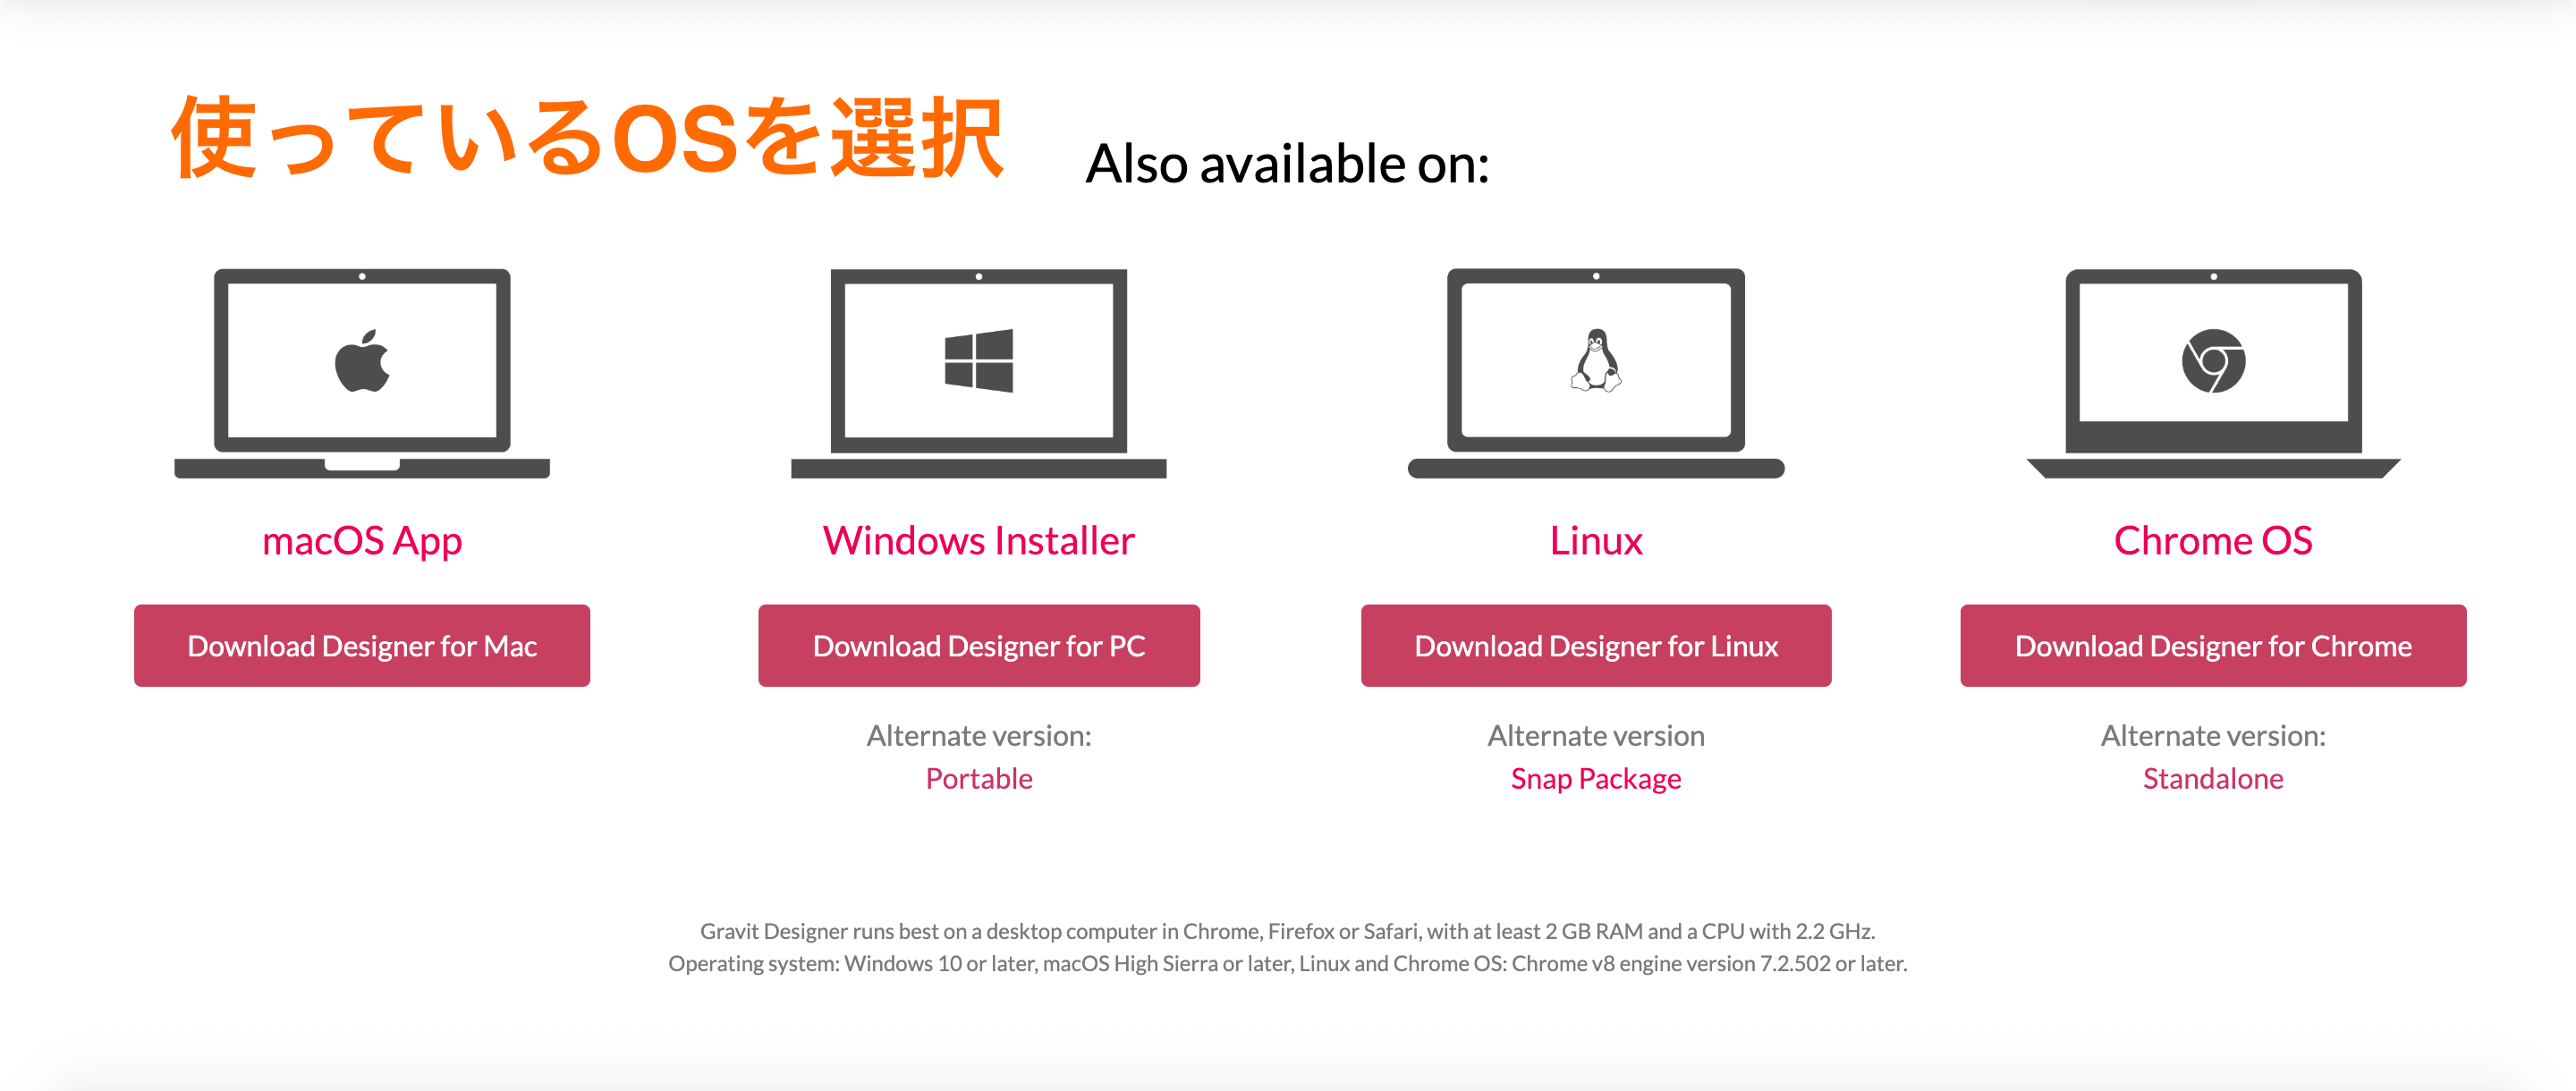
ダウンロードが終わったら、ソフトを起動しアカウント登録を済ませれば始めることができます。
![](https://yumanoblog.com/wp-content/uploads/pochi021-150x150.png)
簡単に始めることができるんだね。
Gravit Designerの使い方【実践】
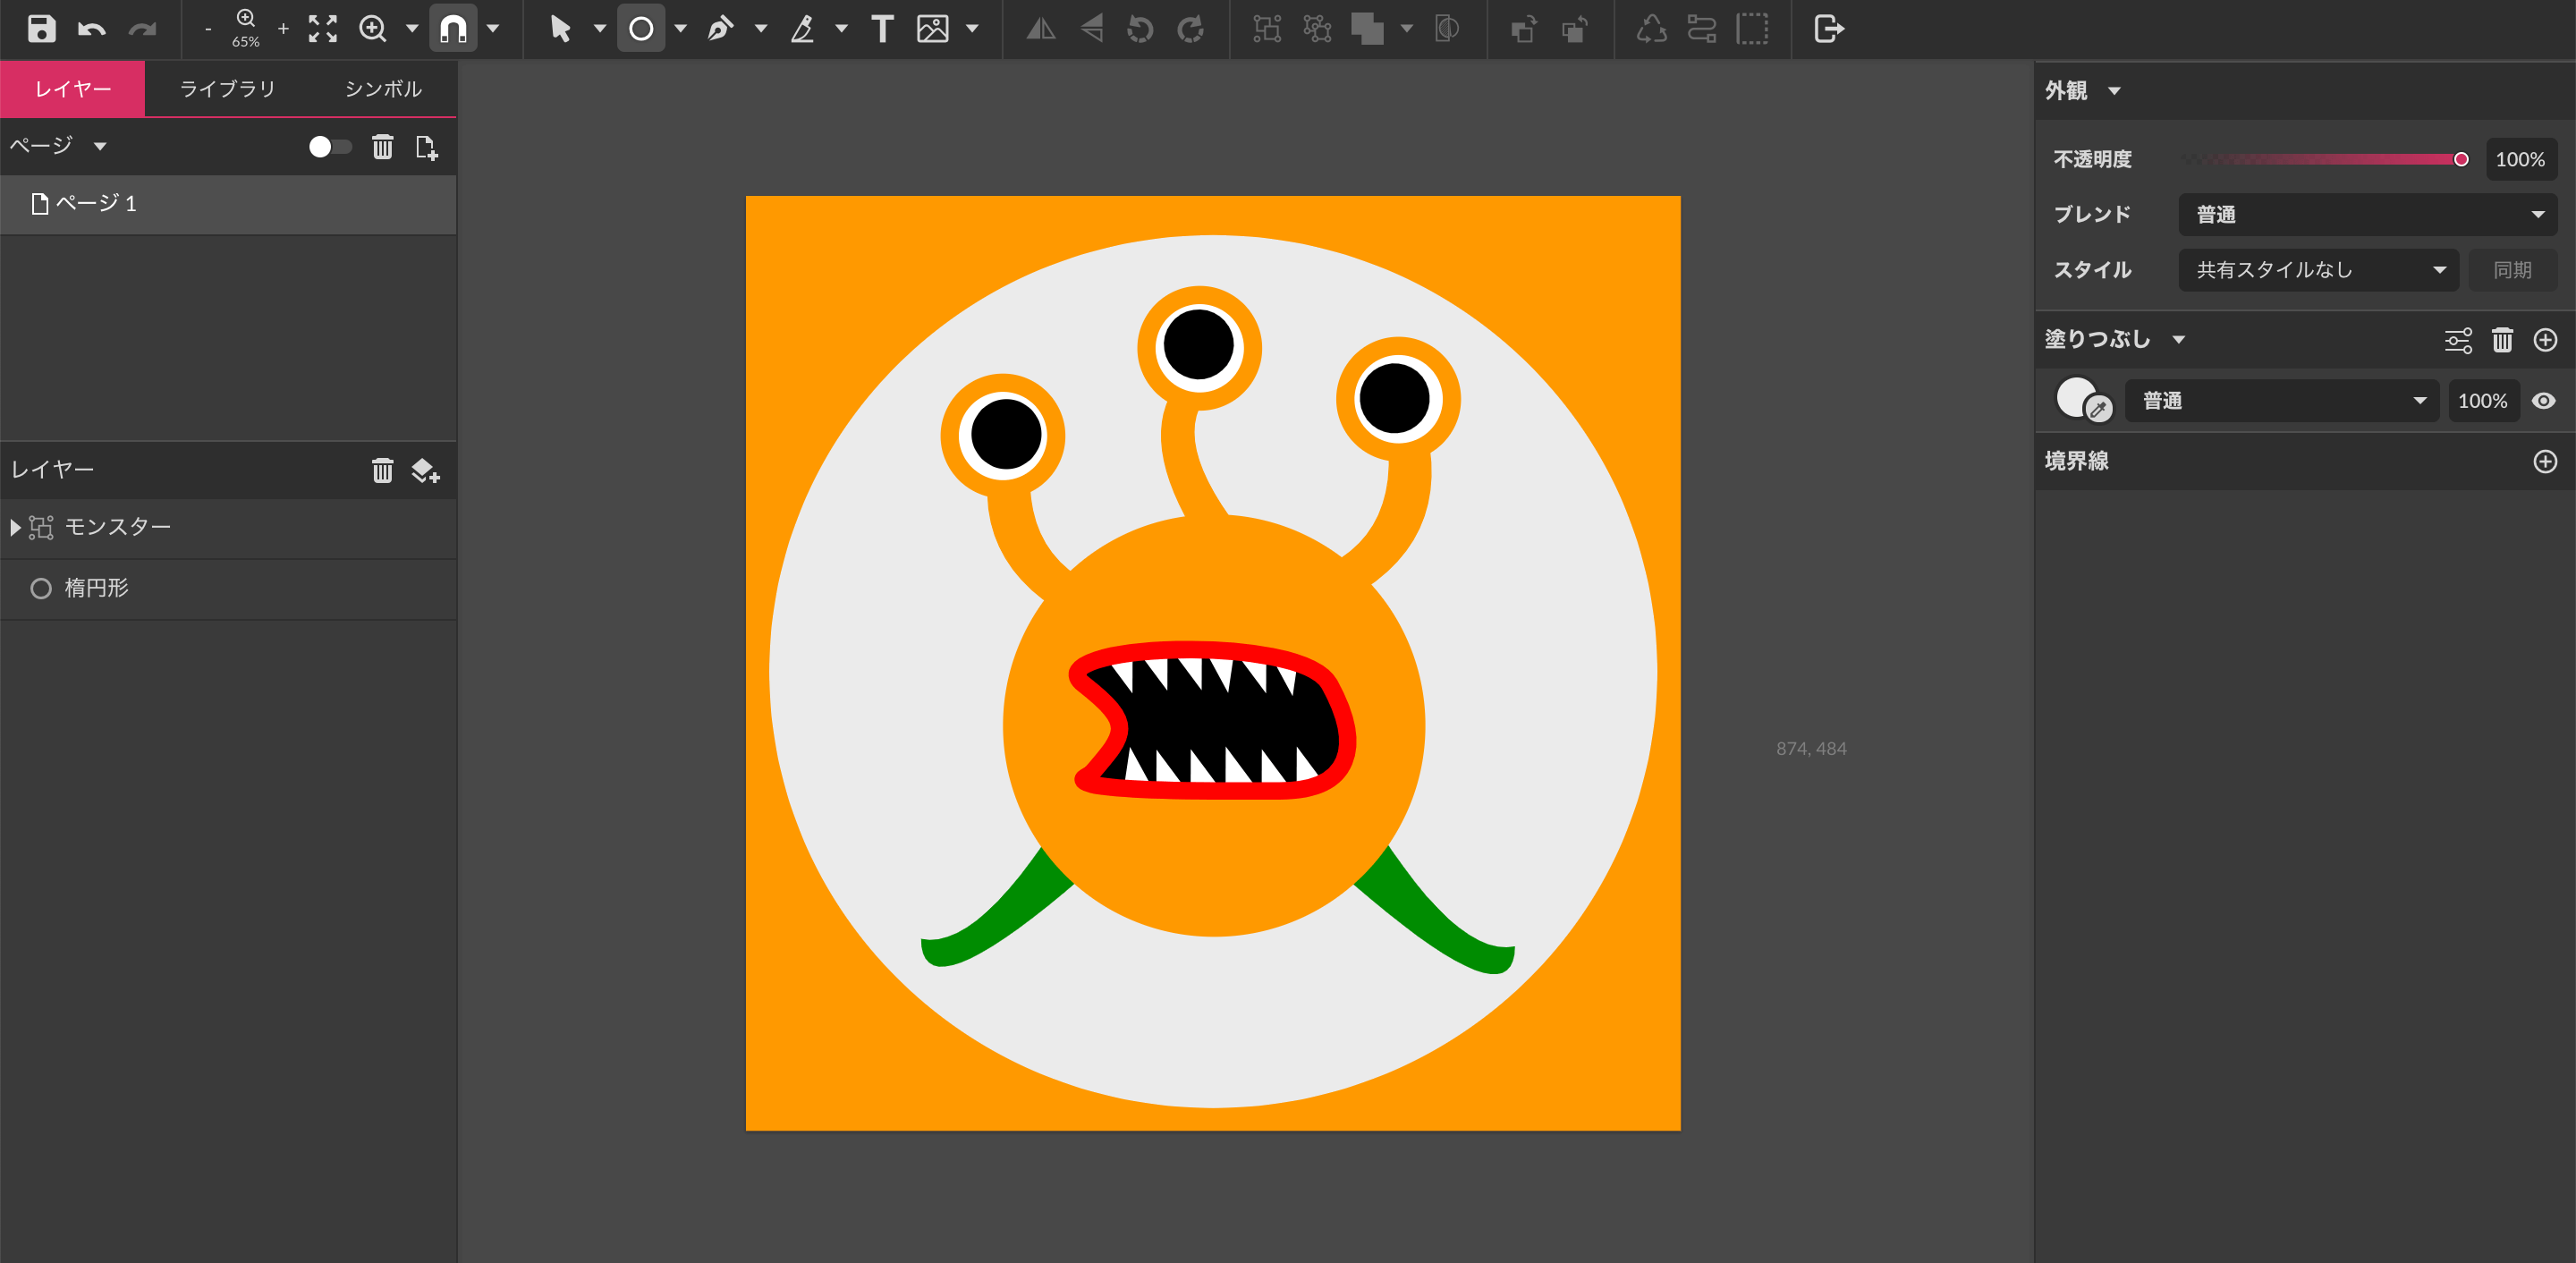
基本的な使い方を、以下のイラストを作りながら解説していきます。
![オレンジ色のモンスター](https://yumanoblog.com/wp-content/uploads/2020/02/monster_Orange-1-300x300.png)
STEP1:キャンバスサイズを決める
Gravit Designerの作業画面を開いたら、まずはキャンバスのサイズを決めます。
![](https://yumanoblog.com/wp-content/uploads/yuma_default-150x150.png)
今回は800×800で作成します。
ちなみにこの時、あらかじめ用意されているテンプレートを選択して編集することもできます。
![キャンバスサイズを決める](https://yumanoblog.com/wp-content/uploads/2020/02/キャンバスサイズを決める.png)
STEP2:体を作る
上部にあるツールバーの中から「楕円形」を選択し、キャンバス上で描きます。
その後右側にある塗りつぶしから、図形の塗りつぶしができます。
![体を作る](https://yumanoblog.com/wp-content/uploads/2020/02/体を作る.png)
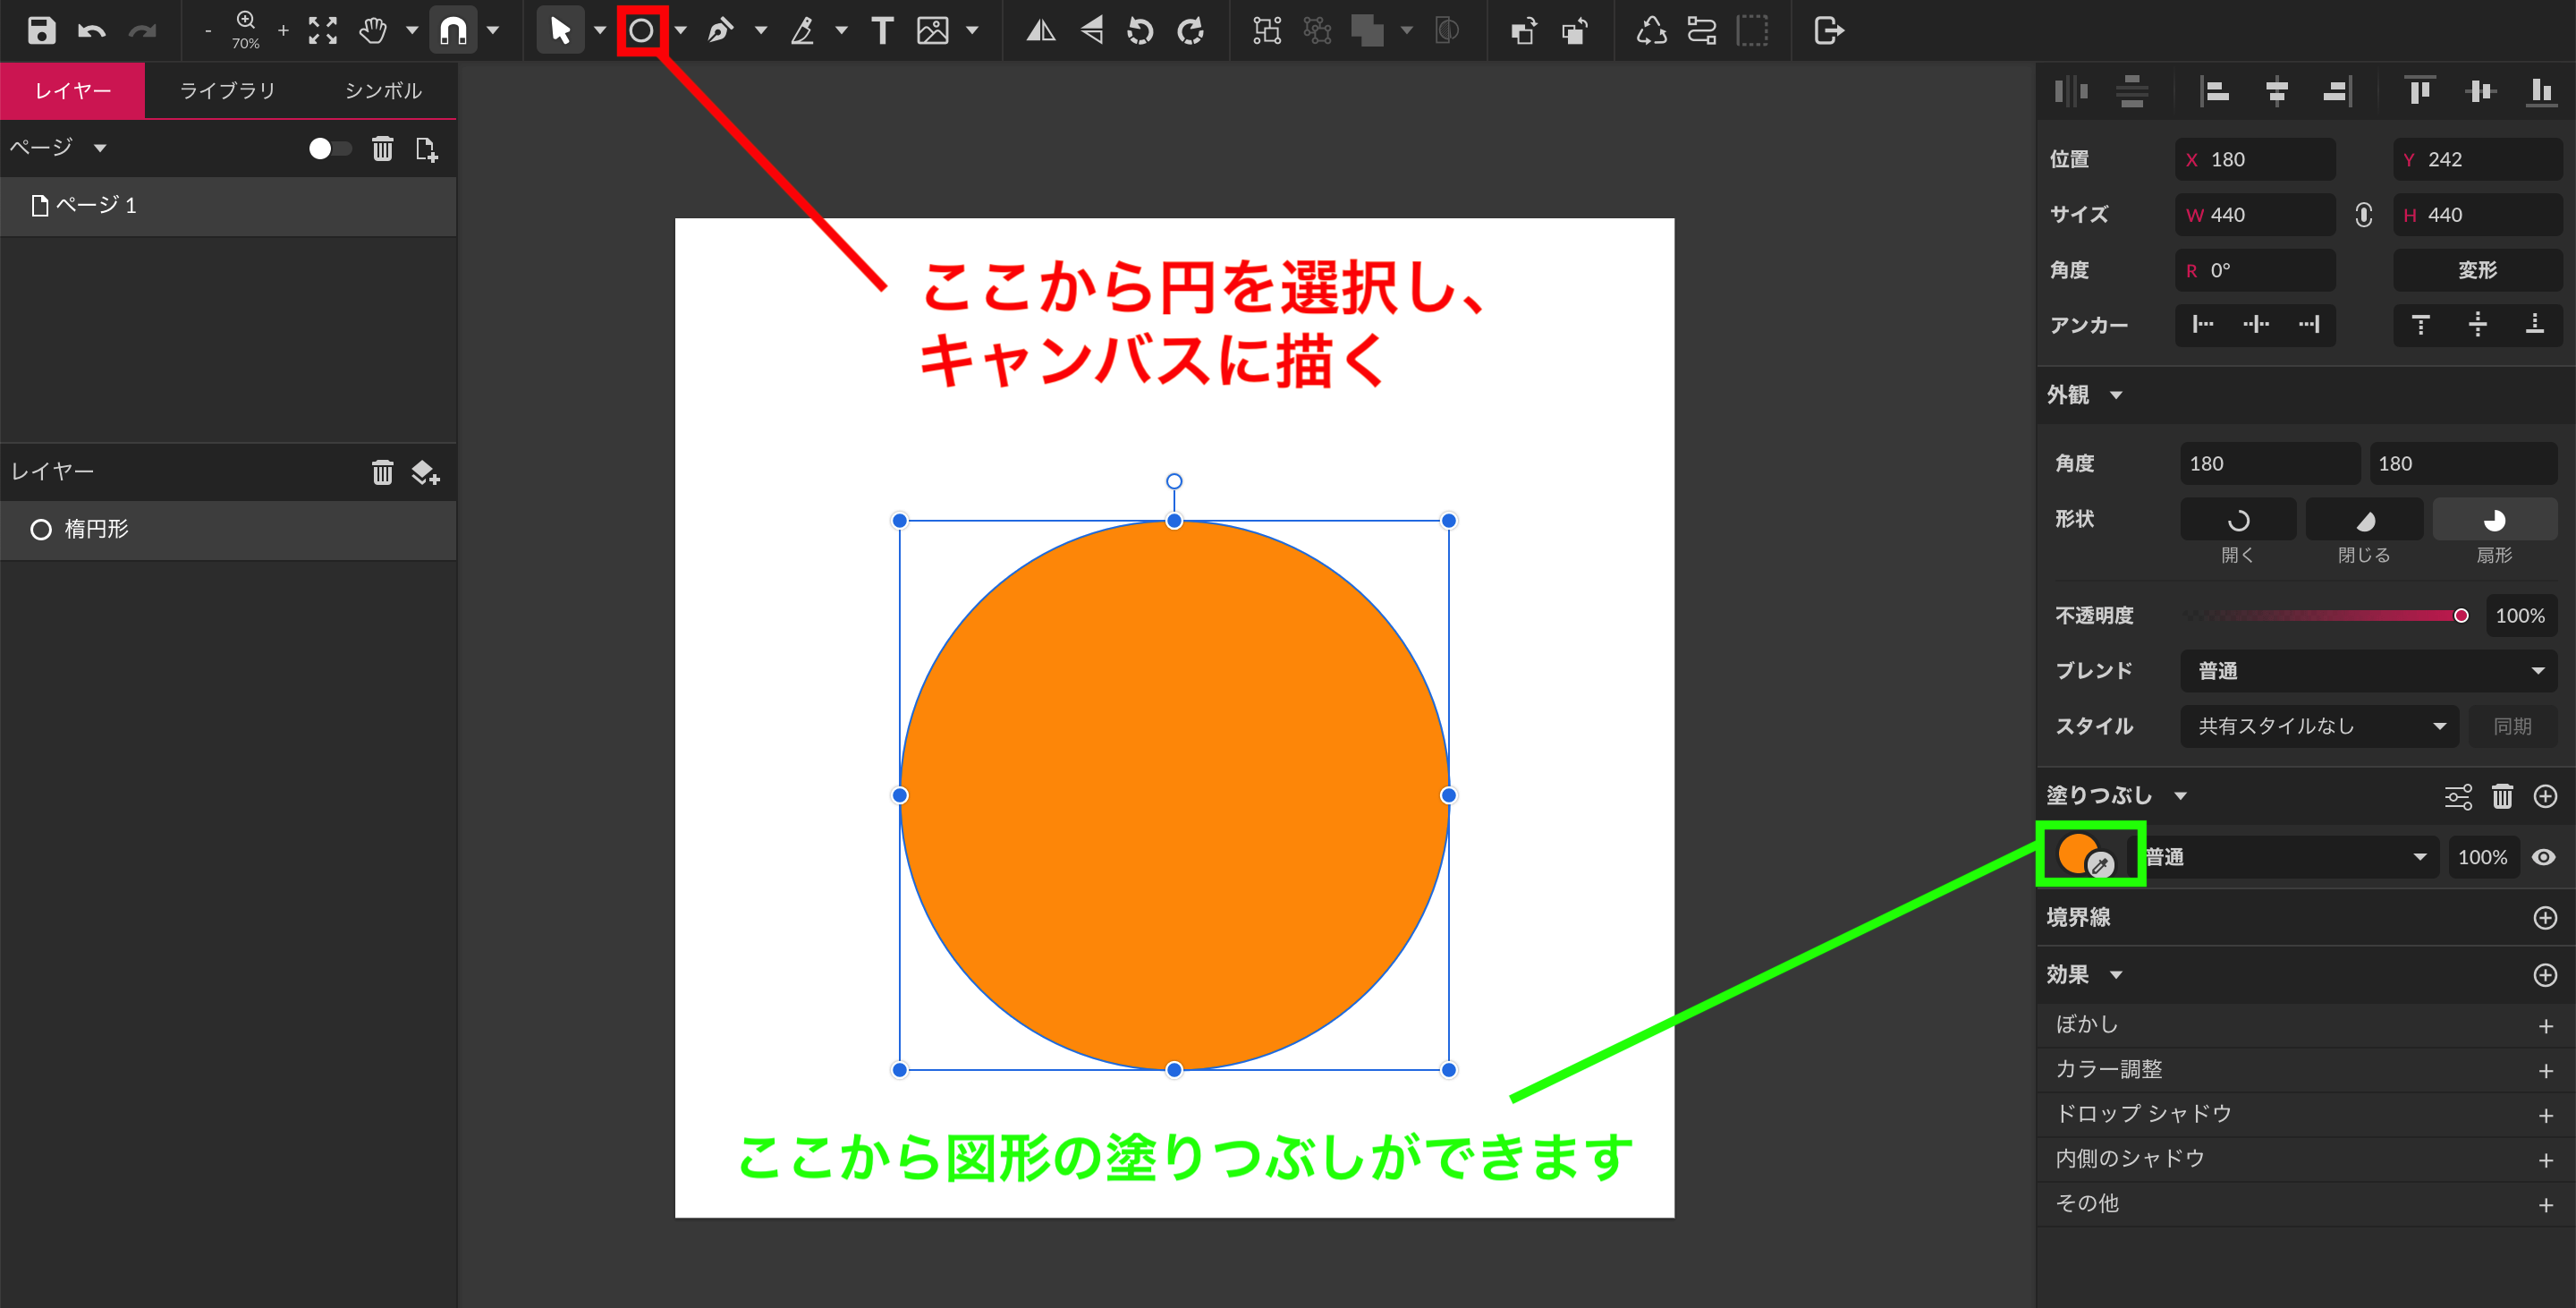
ちなみに円のサイズ調整をしたい場合は、右上にある「サイズ」の数値をいじればサイズ変更可能です。
STEP3:目を作る
まずは目玉の支えになる部分を作ります。
ツールバーの中から「パス」を選択し、キャンバス上で作業していきます。
![パス](https://yumanoblog.com/wp-content/uploads/2020/02/パス.png)
![目玉の支え](https://yumanoblog.com/wp-content/uploads/2020/02/目玉の支え.gif)
目玉の支えを描くことができたら再び楕円形ツールを選択し、目を描きます。
![](https://yumanoblog.com/wp-content/uploads/yuma_default-150x150.png)
図形が増えていくと移動やサイズ調整が大変になってくるので、パーツ毎にグループ化させると管理がしやすくなります。
![目を作る](https://yumanoblog.com/wp-content/uploads/2020/02/目を作る.gif)
![](https://yumanoblog.com/wp-content/uploads/pochi01-150x150.png)
どうやってグループ化するの?
![](https://yumanoblog.com/wp-content/uploads/yuma_default-150x150.png)
合体させたい図形を全て選択した後、command + Gでグループ化できるよ。※Windowsの場合はCtrl + G
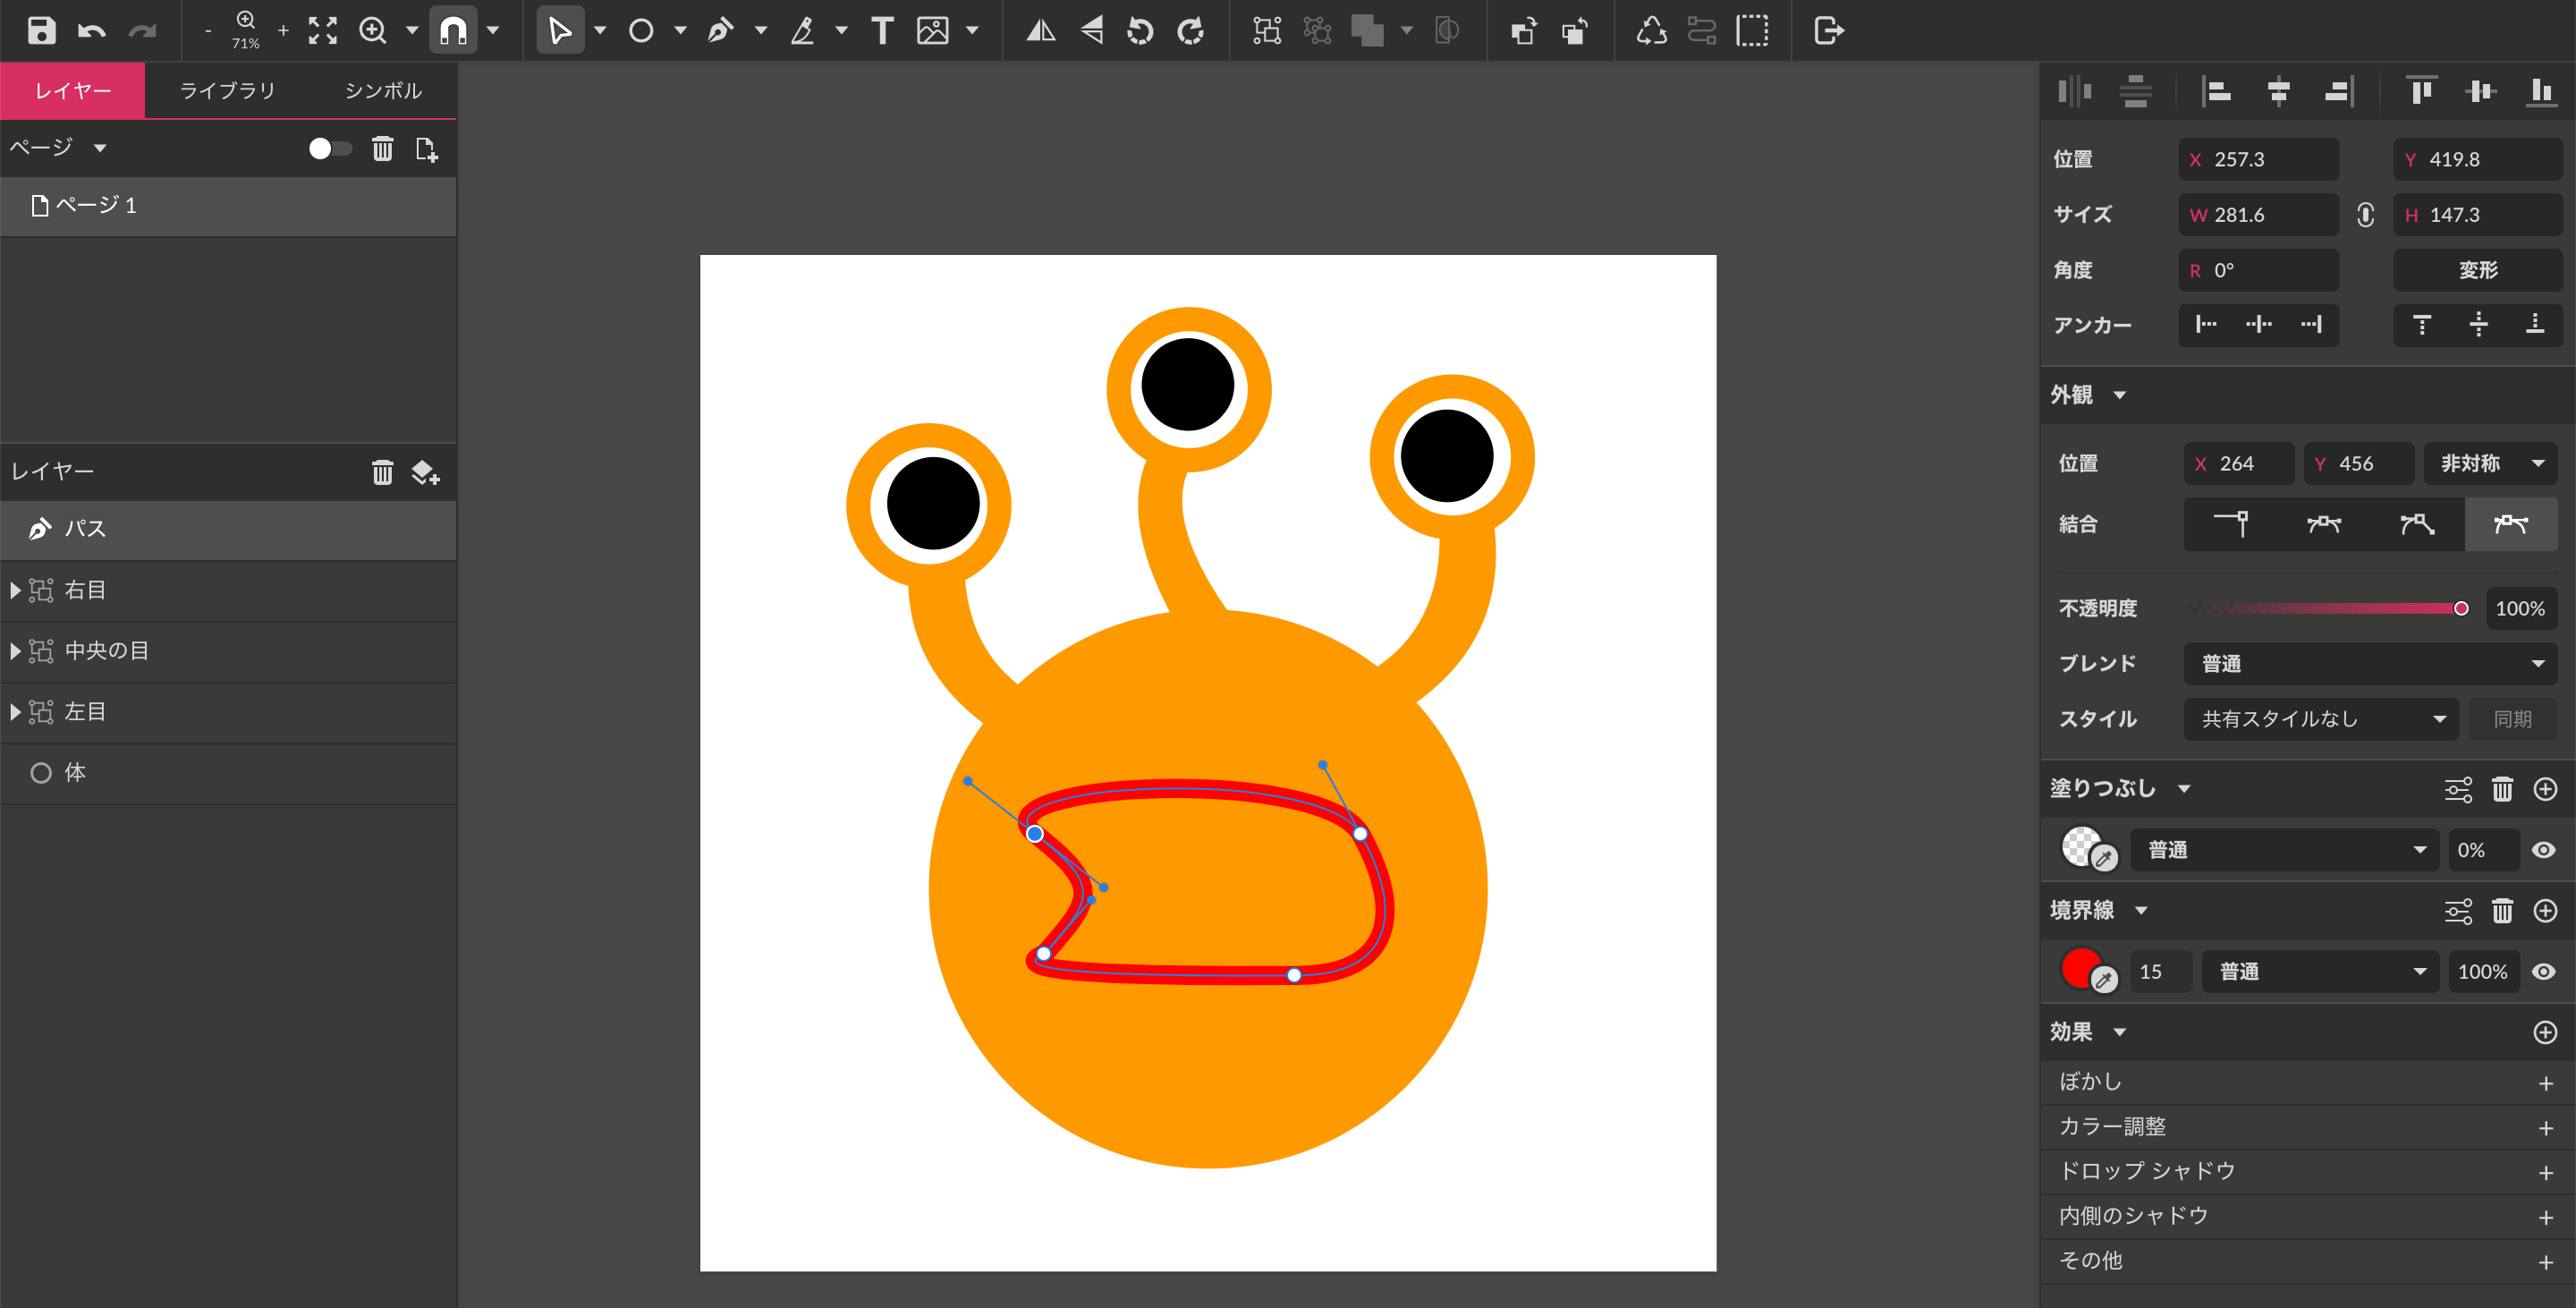
STEP4:口を作る
目の支えを作った時と同じように、パスツールを選択し口を描いていきます。
図形の縁だけに色をつけたい場合、右側のメニューにある境界線にのみ色をつければ反映されます。
![口を作る](https://yumanoblog.com/wp-content/uploads/2020/02/口を作る.png)
![](https://yumanoblog.com/wp-content/uploads/pochi01-150x150.png)
パスが一発で上手くかけないよ。
![](https://yumanoblog.com/wp-content/uploads/yuma_default-150x150.png)
細かい調整をしたい場合は、ツールバーの中から「選択」を選んで調整することができるよ。
![選択ツール](https://yumanoblog.com/wp-content/uploads/2020/02/選択ツール.png)
![](https://yumanoblog.com/wp-content/uploads/pochi021-150x150.png)
これなら簡単に修正できる!
STEP5:歯を作る
歯もパスツールで作っていきます。
歯が口からはみ出ないように、口の中に収めたいという場合は「マスク」ツールを使えば解決です。
![マスクツール](https://yumanoblog.com/wp-content/uploads/2020/02/マスクツール.png)
![マスクツールを使う](https://yumanoblog.com/wp-content/uploads/2020/02/マスクツールを使う.gif)
あとはcommand + C(Windowsの場合はCtrl + C)で歯をコピーして、command + V(Windowsの場合はCtrl + V)で貼り付けていけば口の完成です。
STEP6:足と背景を作る
これまでの流れと同じように、パスツールで足を作ります。
![足を作る](https://yumanoblog.com/wp-content/uploads/2020/02/足を作る.png)
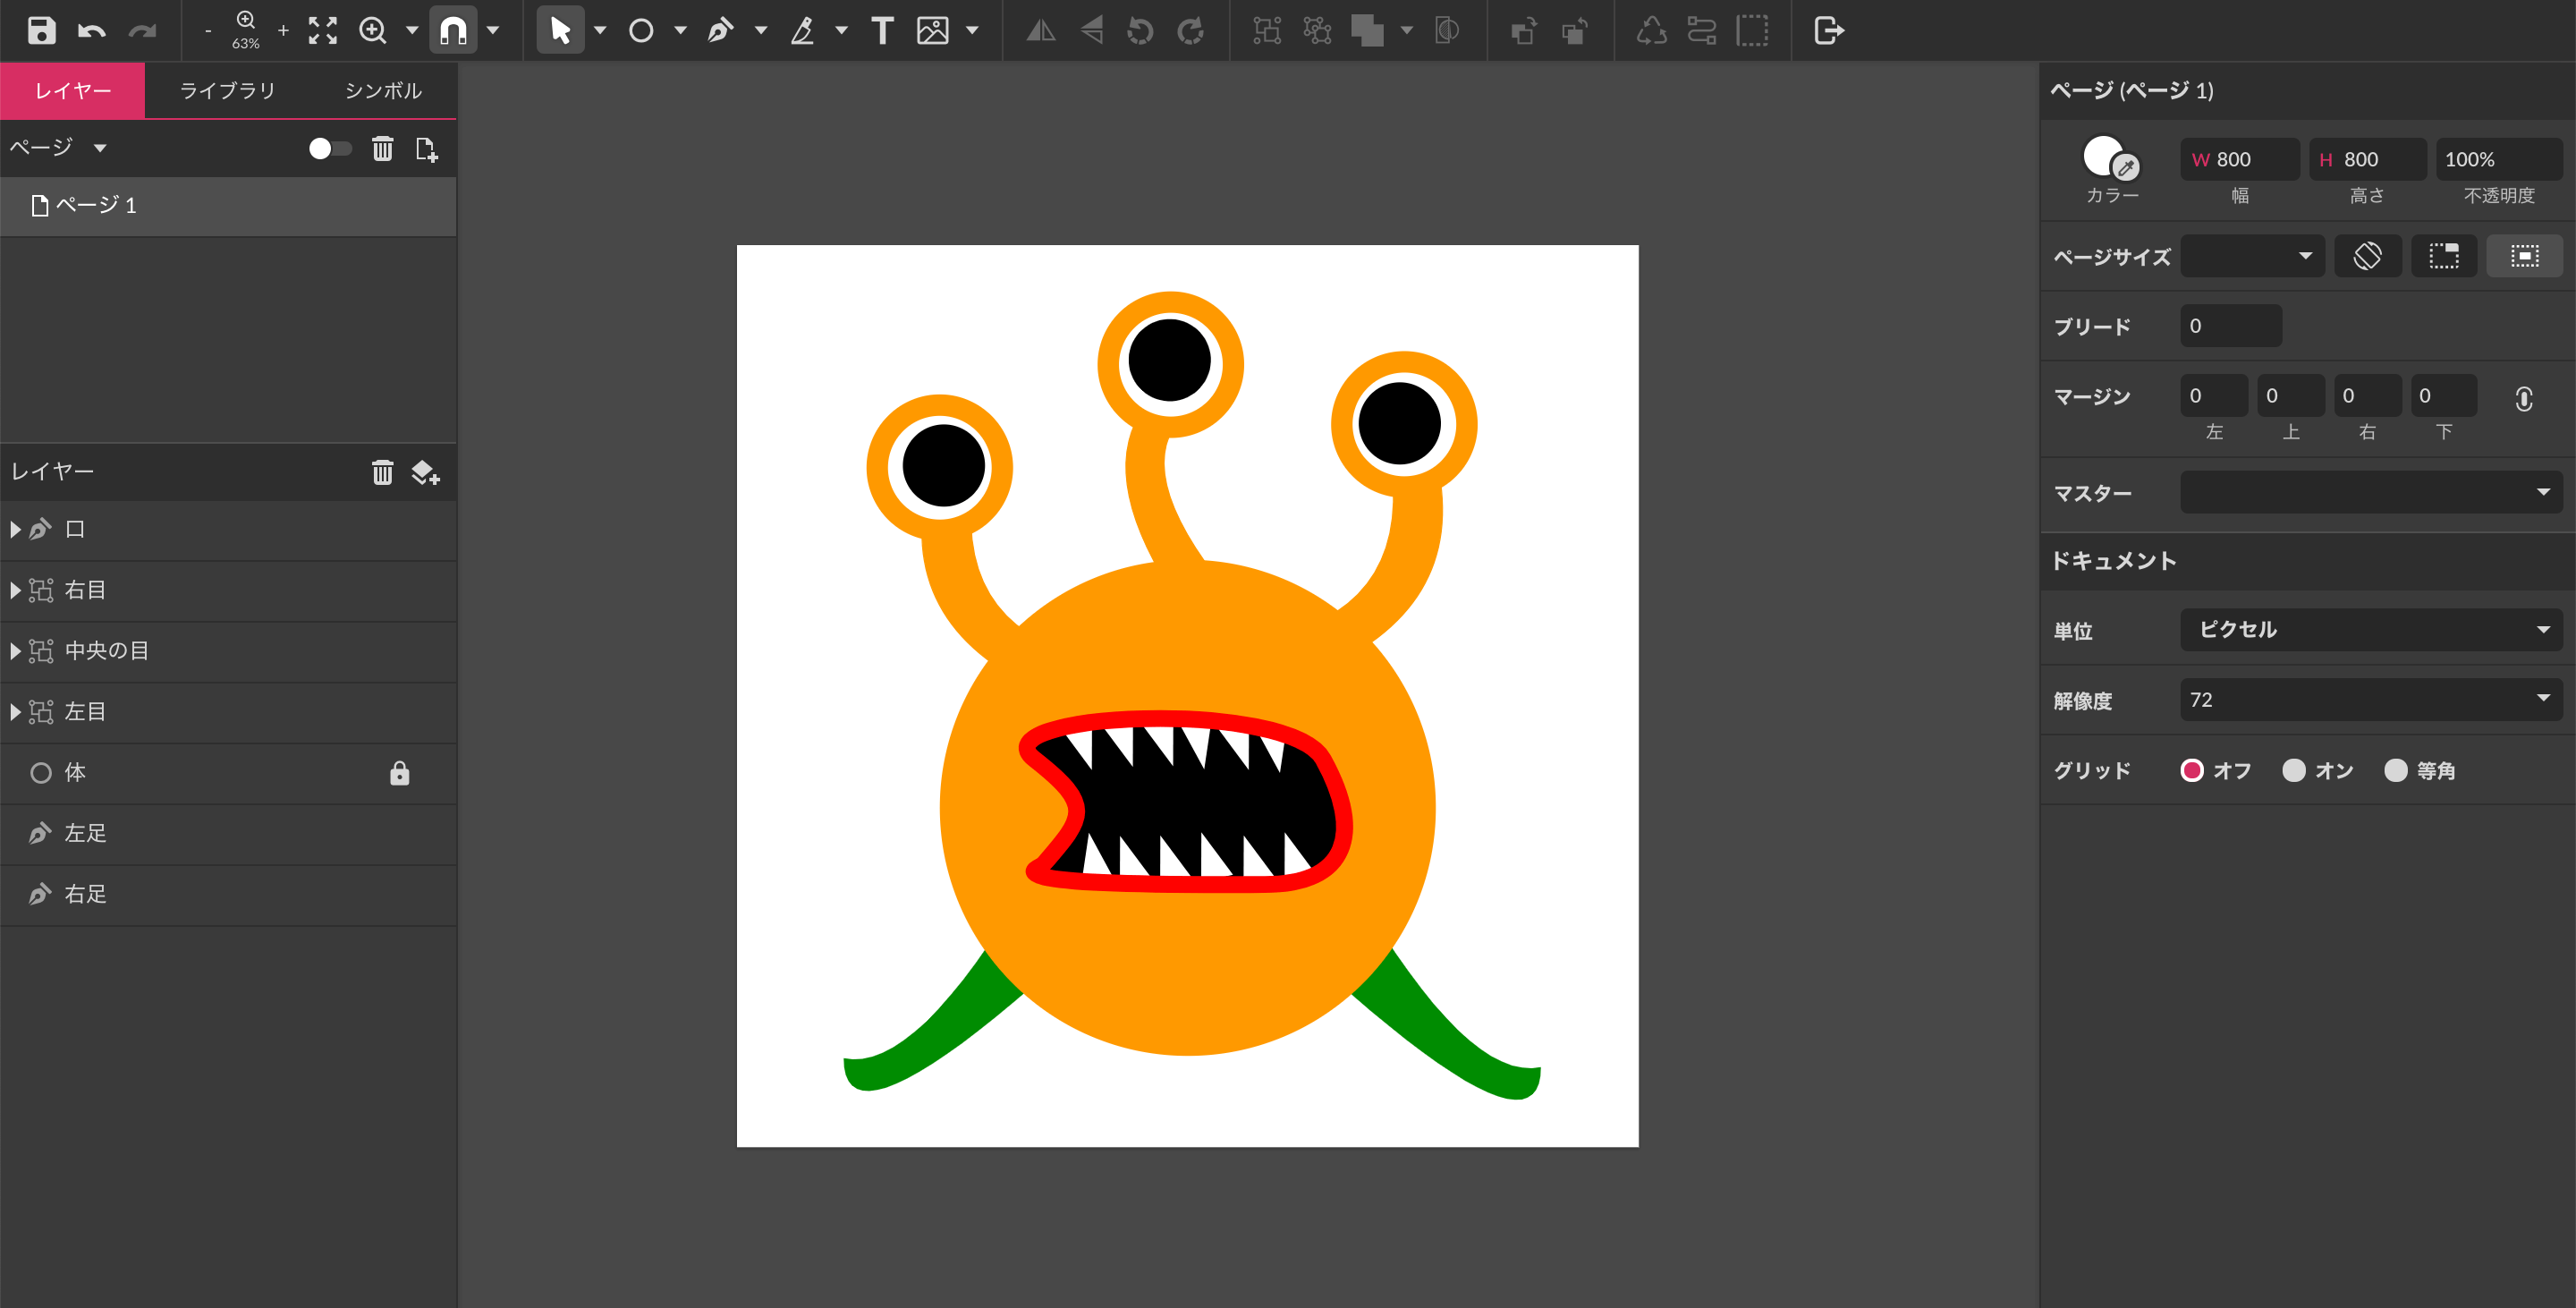
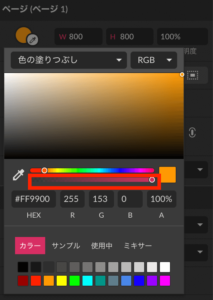
背景の色を変更する方法ですが、図形を選択していない状態で右メニューの一番上にある「カラー」から変更することが可能です。
背景を透過したい場合は、下の画像の赤く囲ってある部分を調整すれば、透過することができます。
![色を透過](https://yumanoblog.com/wp-content/uploads/2020/02/色を透過-213x300.png)
最後に背景の色と同化しないよう、楕円形ツールで白い円を作ってあげれば完成です。
![モンスターの完成](https://yumanoblog.com/wp-content/uploads/2020/02/モンスターの完成.png)
Gravit Designerをさらに極めたい方は
ここまでGravit Designerの基本的な使い方について、実践を交えながらご紹介しました。
「これだけじゃ物足りない!各機能の詳細や応用的な使い方が知りたい。」という方は、公式で用意されているユーザーガイドを活用すると良いでしょう。
>> Gravit Designer公式ユーザーガイド
ちなみにユーザーガイドは英語にしか対応していませんが、ブラウザの翻訳機能(Chromeであれば右クリック→日本語に翻訳)を使うことで、日本語化することができます。
![翻訳機能を使ってガイドを日本語化](https://yumanoblog.com/wp-content/uploads/翻訳機能を使ってガイドを日本語化-1024x417.png)
![日本語化したガイド](https://yumanoblog.com/wp-content/uploads/日本語化したガイド-1024x417.png)
![](https://yumanoblog.com/wp-content/uploads/yuma_default-150x150.png)
翻訳機能の精度に依存するので、多少変な日本語が混じっていますが、意味はちゃんと理解することができるので問題ないですね。
![](https://yumanoblog.com/wp-content/uploads/pochi021-150x150.png)
ユーザーガイドを熟読してGravit Designerマスターを目指すぞ。
最後に
![](https://yumanoblog.com/wp-content/uploads/pochi021-150x150.png)
無料なのにとても便利なんだね。もっと応用的な使い方も知りたいな。
![](https://yumanoblog.com/wp-content/uploads/yuma_default-150x150.png)
ツールの使い方は基本的にイラレと一緒だから、イラレのテクニックを紹介しているサイトが参考になるよ。
![](https://yumanoblog.com/wp-content/uploads/pochi021-150x150.png)
そうなんだね。そうと聞いたらイラレのテクニックを調べてくるよ、バイバイ!